
Getting started with Nvidia Jetson Nano, Yolov7 and Docker - part I
This article is part of a multi part series on developing computer vision applications. Here are the links to the other articles:
- PART 1 - SETTING UP THE JETSON FOR DEVELOPMENT
- PART 2 - RUNNING YOLOv7 INSIDE A DOCKER CONTAINER ON A JETSON (NANO)
PART 1 - SETTING UP THE JETSON FOR DEVELOPMENT
Intro
This is the first part of what I hope that is to become a four part series of articles about getting started with computer vision on an inexpensive computer with a powerful (but not full blown) graphical unit. It has taken me a few years to get to a point to be able to write about this setup and although I have come across many interesting and helpful tutorials about these subjects my main goal is to write a series of articles that can get you started faster, without wasting hours on google/chat GPT queries about problems you will encounter.
I'm just a coding enthousiast with a strong will to make things work, I'm not a computer scientist, I'm not an engineer, I'm just a guy trying to get things - passionately - done.
Note: This content is not affiliated with any of the brands/software mentioned in this series.
A good coding environment is always a good strating point, you have to be comfortable with the tools you are using. It can be daring when you first unbox the Jetson to immediately start developing on it, hooking up your mouse & keyboard, a monitor, probably a webcam and what else. But I've experienced that when developing on a 2nd machine, be it a Jetson, a raspberry PI or an Arduino, ... at some point in time you'd wish you could just work on the machine you are most familiar with, the machine you use every day (for development and reading you emails). That's why this first chapter is primerily dedeciated to setting up that environment.
Preface
To be able to follow along nicely I recommend you at least have some basic knowledge about the following subjects.
- Docker and docker-compose
- Linux systems (and computer hardware in general)
- Python development
- The basics of running (sudo) commands using a Terminal
- Some sort of IDE (I will be using VS Code)
Hardware
Before we start with setting up your Nano, I recommend the following hardware:
- a Jetson Nano, if you have the means to buy a more powerful board and you have a good use case for it, by all means do so ! For the purpose of this series a Nano will suffice and financially they aren't that much of a set back, but don't take my word for it.
- a micro SD card, I suggest going for 128Gb, but 64 will also do the job.
- an SD card slot, to my own surprise I discovered that not every computer ships with one of those these days
- an extra mouse & keyboard
- a 2nd (or 3th) monitor
- an hdmi switch, get one, you won't regret it, I bought one for 10€, I wish I had bought 2...
- a utp switch (the Nano does not ship with Wifi) Here is a cheap one? I wish I bought 2...
- a desk, large enough to fit this all on to.
PS: If you have access to a gaming PC (be it linux or Windows) with a NVidia Graphics card you should be able to follow along, however these articles are focussed on running computer vision applications on less powerfull devices. also given the fact that all Jetson devices are ARM based chipsets the Dockerfile base images I will be referencing will not work on x86_64 chipsets and will need to be replaced by their x86_64 equivalents.
Software
Setup your Nano
Setting up your Jetson couldn't have been easier, but do make sure you have an sd card (minimum 64Gb, but preferably bigger) and a sd card slot to build your jetson image.
The steps to get you started are excellently explained on nvidia's developer documentation, so I'm not gonna repeat them here.
Installing Barrier
You now have 2 computers, this is great but wouldn't it be even better if you could just move your mouse from your main (dev) computer over to the Jetson, open a terminal, run some commands and come back and check that email that just came in?
The good news is there is a piece of software named Barrier that allows you to do this, and believe me, once you are used to this workflow it's hard to do without.
Start off by installing barrier on your host/main computer, if you're on a mac, brew has you covered. For windows you can download the latest installer from their github release page. (Linux users read on)
Now for the Nano (or if your host computer is also a linux)
sudo snap install barrier
I found that the Barrier app is also available through the (Ubuntu) software app, so you could just install it from there. Having issues? Please let me know in the comments !
If both your host and the Jetson nano are on the same network both services should be able to find and talk to eachother using the auto config setting. If that's not the case, find the local network ip of your host computer and use that as the server ip on the jetson.
If all went well, you should now be able to move your mouse to your Jetson and start playing around. Now check your mail!
Why did I need a second mouse & keyboard then, you ask. The answer is that every time the Jetson reboots you'll need a way to start Barrier again, I've tried autostarting it, but I haven't found a stable solution, yet. I thought I'd rather spend my time doing computer vision and writing this article. Again, you can find the comment section somewhere below.
Installing VSCode
I've seen many IDE's come and go, Eclipse, inteliJIdea, PHPStorm, Sublime, Textedit, Don't get me wrong, they're all great pieces of software. But lately I find myself using VSCode for just about anything. I also do a fair amount of PHP, I know PHPStorm is a better option, but when the time comes you are developing an Arduino project next to a Laravel solution and you realise it can even debug smart contracts written in Solidity, you just know you have a winner.
Enough about that, vim and gedit are cool, but let's just install vscode on the nano, shall we?
wget -N -O vscode-linux-deb.arm64.deb https://update.code.visualstudio.com/latest/linux-deb-arm64/stable
sudo apt install ./vscode-linux-deb.arm64.deb
Next I want to be able to edit the code on my Jetson directly from my mac. We can move our mouse over there, but have you tried typing brackets ? VSCode has us covered.
Installing the Remote Development extension pack (Complete instructions are here)
On your Jetson, open VSCode, in the extensions tab search for Remote Development extension pack and click install.
Try to establish a connection from your host machine:
ssh jetson_user@jetson_ip (replace with your user and ip)
Note: if the connection gets refused, make sure the openssh-server is installed on the Nano:
sudo apt-get install openssh-server
Now in VSCode on your host machine open the command prompt (CMD/CTRL - P) and type Remote-SSH Connect to Host.
Click + Add New SSH Host...
Type: ssh jetson_user@jetson_ip (replace with valid user and ip with the actual user and ip your Jetson has in your local network)
You can now open any project located on the Jetson drive from VSCode on your host machine !
BONUS: Copy your public key to your jetson:
On your host machine: ssh-copy-id jetson_user@jetson_ip
Are you happy ? wait for it...
On your host computer open the VSCode command prompt (CMD/CTRL - P) and type Remote-SSH Connect to Host, this time select Configure SSH Hosts..., then select the .ssh/config file under your user's home directory and complete the listing so it reads something like this.
Host jetson
    HostName your.jetson.ip.address
    User your_jetson_user
Installing docker
What a wonderful world, docker comes presinstalled on the Jetson JetPack images !
But there is a problem that we need to address.
By default the Jetpack docker deamon is not aware of its powerfull friend, the GPU. This can be a problem that can lead to great frustration later on when you start to write your own docker images and installing packages (let's say opencv) from source and only after endless waiting on builds finishing you find out that your code just can't talk to the GPU because it doesn't know it's there. :/
When running docker images on the Nano (or any Jetson), you'll often see these instructions:
docker run -it -rm --runtime nvidia <some.docker:image> (pseudo code)
When using the --runtime nvidia argument we are actually telling docker there exists "a thing" called nvidia-runtime that knows about CUDA and tensors. But the problem is you can't do this:
docker build --runtime nvida my:latest . (pseudo code)
$ unknown flag: --runtime:nvidia
Ok, here's the thing: we need to update the docker daemon.json and set the default runtime hardcoded (as suggested here).
Follow these instructions:
-
sudo vim /etc/docker/daemon.json -
To start editing a file in vim first type
ifor insert -
the json config should look like this:
{ "runtimes": { "nvidia": { "path": "nvidia-container-runtime", "runtimeArgs": [] } }, "default-runtime": "nvidia" } -
save: ESC + :wq!
-
restart docker daemon:
sudo systemctl restart docker -
now we can start building images with the ease of mind that our little GPU friend will be accesible !
First run
Now we're ready to run our first docker container. Although technically you do not need to change the default docker runtime to run this demo. But it's a good setup.
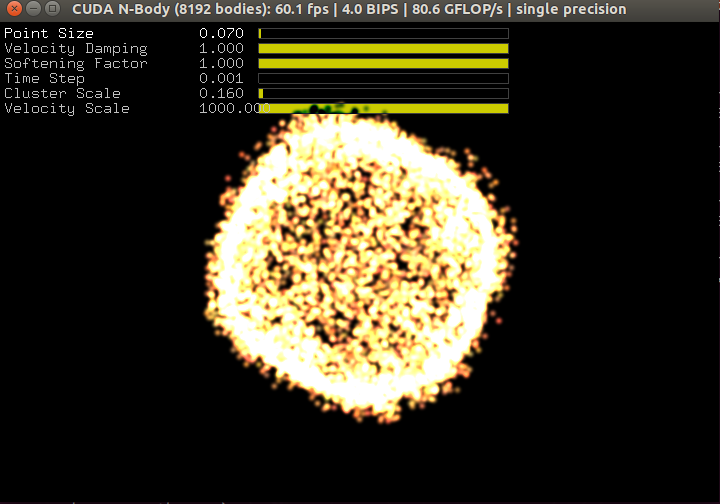
We're now going to run a demo provided by Nvidia to demonstrate the power of our little device and see if we can really access the GPU, all this with the ease of use of our new setup.
To run inference inside a docker container we need to make sure the container has access to the GPU. Luckily for us Nvidia has us covered. We'll try out one of their docker images as a starting point to see if the container can do what we want it to.
sudo xhost +si:localuser:root
$ localuser:root being added to access control list
Check your nv_tegra_version: L4T-README/version/nv_tegra_release
Mine looks like this:
R32 (release), REVISION: 7.1, GCID: 29818004, BOARD: t210ref, EABI: aarch64, DATE: Sat Feb 19 17:05:08 UTC 2022
Now make sure you edit the docker image version below so it matches your jetpack version, this is important !
docker run --runtime nvidia --network host -it -e DISPLAY=$DISPLAY -v /tmp/.X11-unix/:/tmp/.X11-unix nvcr.io/nvidia/l4t-base:r32.7.1
Then enter these instructions:
apt-get update && apt-get install -y --no-install-recommends make g++
cp -r /usr/local/cuda/samples /tmp
cd /tmp/samples/5_Simulations/nbody
make
./nbody
You should see something like this:
I hope you like what you're reeding here. We haven't yet covered much computer vision stuff yet, I know. But in the next article we'll start writing our own Dockerfile and using that to install yolov7 and run inference on an image, a video and a live video/rtsp feed.
See you later !